Easter Cupcakes
Hello lovelies!
Hope you all had a great Easter and the recovery from all the chocolate eating is going well! I must admit I'm still not done at all with my chocolate overdose cause there were two cute, adorable and tempting cupcakes in the fridge calling my name and well...this morning's breakfast has been a little more special than usual, and sweeter, so much sweeter! ;-)
Like I told you last year, Easter in Catalonia ends with the traditional 'Mona de Pasqua' cake on Easter Monday (it was two days ago, hence the tempting cuppies left in my fridge this morning). This cake can be chocolate figures or different kind of cakes decorated with chocolate eggs, chicks and some little toys.
These cupcakes were clearly inspired by the cake I made last year but I opted for a healthier and lighter version to compensate for the excess chocolate eaten lately (I baked a Sacher cake for my mom's birthday only 2 weeks ago and my sister bought some delicious Neuhaus easter eggs and Godiva truffles!).
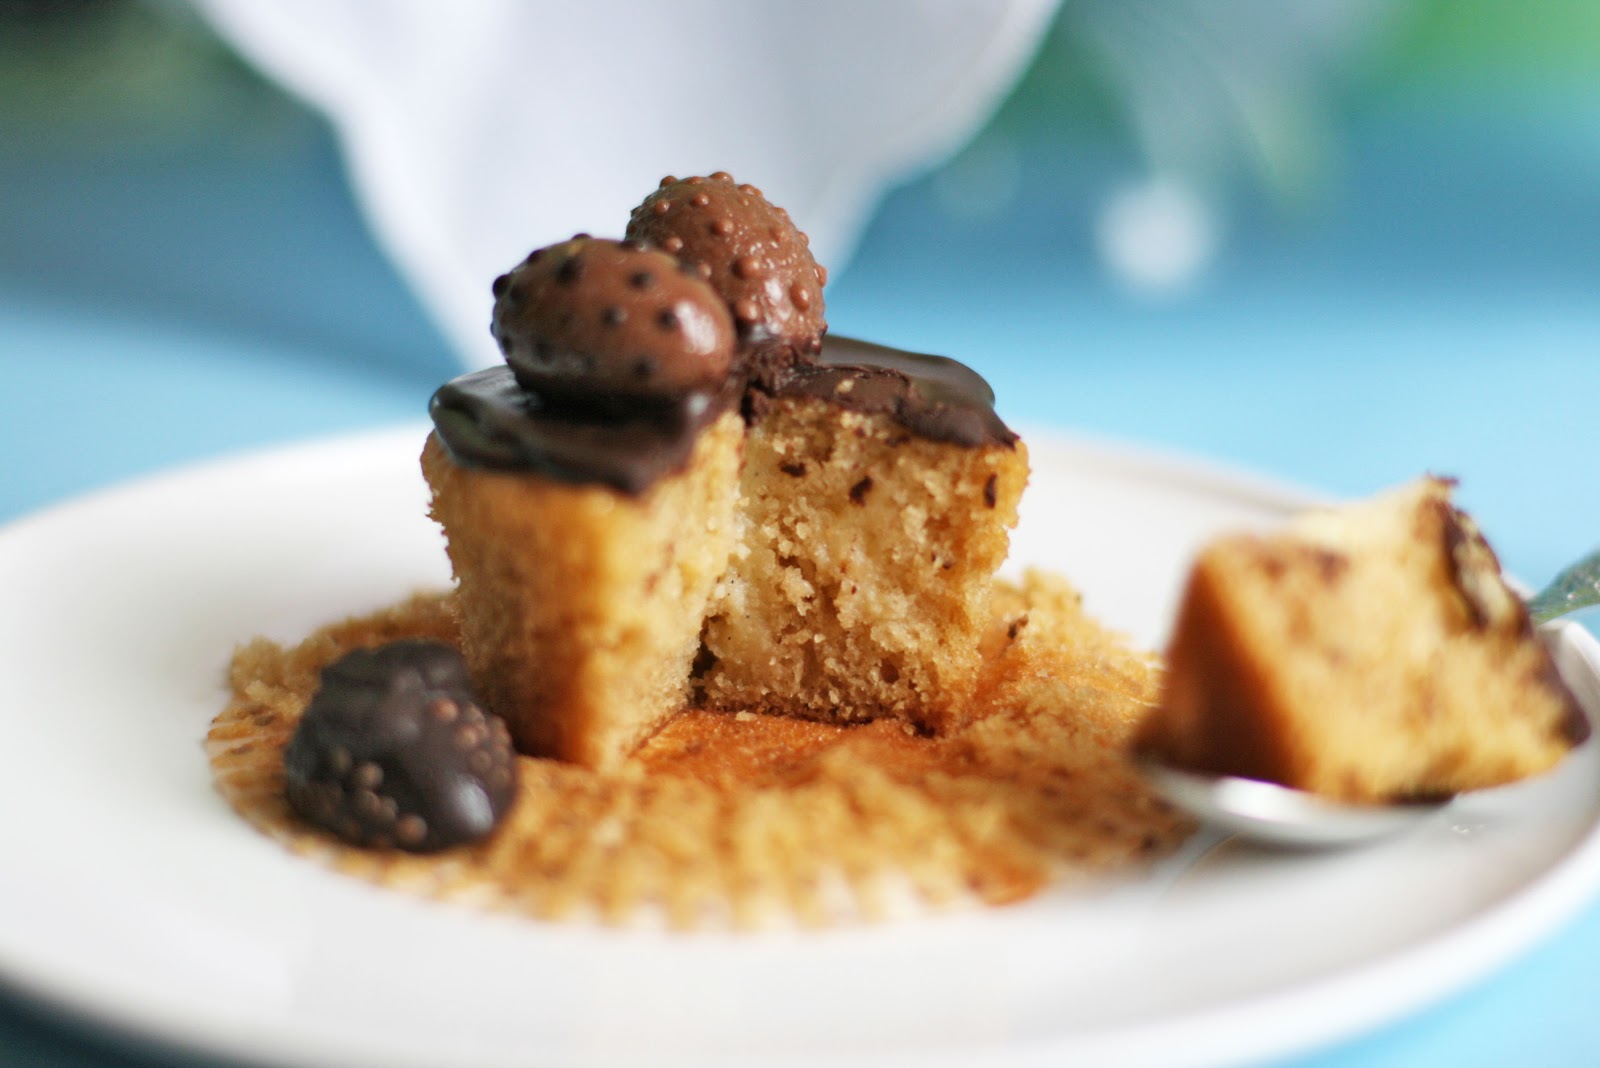
Right before we go straight into the recipe let me tell you how good these cupcakes are in just one word: delicious! You'll love the creamy rich filling, this vanilla custard is pretty addictive and makes you feel it's never enough. The dark chocolate ganache adds a bonus point to the deliciousness...because, what's an Easter cupcake without chocolate? ;-)

Easter Cupcakes
Ingredients
(makes12)
-For the cupcakes:
1 cup soy milk
1 tsp apple cider vinegar.
1 1/4 cups all-purpose flour.
2 tbsp cornstarch.
3/4 tsp baking powder.
1/2 tsp baking soda.
1/2 tsp salt.
1/3 cup sunflower oil.
3/4 cup granulated sugar.
2 1/4 tsp vanilla extract.
-For the dark chocolate ganache:
1/4 cup soy milk.
4 ounces dark chocolate, chopped.
2 tbsp maple syrup.
-For the vanilla custard:
2 egg yolks.
4 tbsp sugar.
1 1/2 tbsp cornstarch.
1 cup milk.
vanilla pod.
-To decorate:
Chocolate eggs.*
*I also made the chocolate eggs melting dark chocolate and using a silicone Easter eggs mold. I painted them with melted white, dark and milk chocolate.

Directions
Vanilla cupcakes:
Preheat oven to 350ºF (180 ºC) and line
cupcake pan with paper liners.
Whisk the soy milk and vinegar in a
measuring cup and set aside a few minutes to get curdled.
In a large bowl beat together the soy
milk mixture, oil, sugar and vanilla.
Sift in the flour, cornstarch, baking
powder, baking soda and salt and mix until no large lumps remain (dry ingredients previously sifted all together in a large mixing bowl).
Fill cupcake liners 2/3 of the way and
bake for 20 to 22 minutes till done.
Transfer to a cooling rack and let cool
completely.
Vanilla custard:
In a medium saucepan heat milk
with vanilla until it boils, then remove from heat.
Cream the
egg yolks and the sugar together until thick and pale in colour.
Beat in the
cornflour and make a smooth paste.
Add this egg
mixture to the hot milk, return to the heat again and stir constantly with a
large whisk until the cream begins to get slightly thick (it'll gain more
consistence once it is completely chilled).
Dark chocolate ganache:
Bring the soy milk to a gentle boil in a small saucepan. Immediately remove from heat and add the chocolate and maple syrup. Use a rubber heatproof spatula to mix the chocolate until it is fully melted and smooth. Set aside at room temperature till ready to use.
Filling and frosting the cupcakes:
As you can see in the pictures below I injected the custard directly into the cupcakes but you can also carve out a small hole in the center of each cupcake and gently fill them with a generous amount of custard.
Spread two layers of chocolate ganache so you will get a more even and smooth-looking frosted cupcake. First frost the cupcakes with a thin layer of ganache, let it dry a bit and spread the second layer. If by the time you are going to add the second layer the chocolate ganache gets thicker and less shiny just reheat it a bit and it'll be perfect again. This ganache is by far one of the best I've ever tried!


Que monada!!! que buenos y tentadores y que paciencia con la decoración de los huevos!!! eso sólo lo puedes hacer tu!!! besos
ReplyDeleteMuchas gracias Silvia! La verdad es que yo sola me podía haber pasado horas...así que esa tarde tuve a mi hermana de ayudante, pintando huevitos, jeje. :-)
Deletetienen una pinta buenisima, muy bonitos :D
ReplyDeleteEstán muy ricos, sí. Muy tiernos y con la crema por dentro...son un vicio! ;-)
Deletei love how you went that extra step and decorated the chocolate eggs, that is really taking it to the next step plus they are WAY cuter too
ReplyDeleteThanks a lot Meg! Painting the eggs took quite a lot of time but it was worth it! :-)
Delete